Graflex
Home Portrait
Sixten
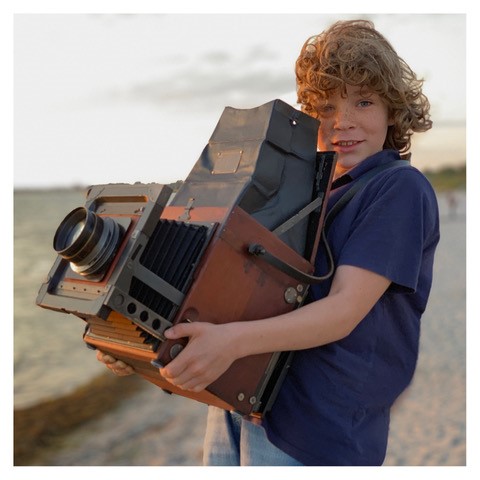
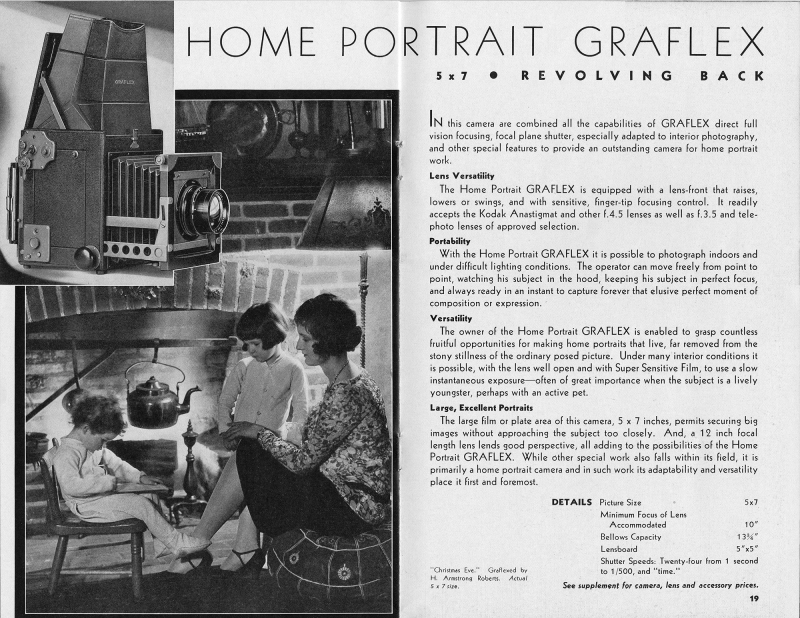
Miles Moen carrying the huge 5x7 Home Portrait.
Photo © Vegar Moen.
Revolving Graflex Back 5 x 7
for Landscape and Portrait
1912-1940
Huge Reflex Camera long 25,5 cm x 24 cm wide
x 23 high
Interchangeable 5x5 inch Lensboard -Swinging Front to correct perspective.
Two or more Curtain Apertures to exposure - Roller blind Shutter Speeds -Time -1/2 to 1/500
Thanks to Mr. Vegar Moen Sweden providing his Home Portrait
camera for repair and refurbishing.
 The
Home Portrait Graflex camera is equipped
with the well known Graflex Focal Plane shutter, but it distinguishes itself
through 4 rather then 5 slits. Further more a special smart shutter mechanic which enables
slow snapshots where normally time exposure would be required, which is
especially adaptable for interior photography.
This shutter will give automatic exposures as long as 1/2 second or
instantaneous exposures of any duration up to1/500 of a second. This is a small
but interesting and very usable feature., because increased illumination may be secured with automatic exposures, by
adding one or more of the exposures apertures to the full curtain opening
The
Home Portrait Graflex camera is equipped
with the well known Graflex Focal Plane shutter, but it distinguishes itself
through 4 rather then 5 slits. Further more a special smart shutter mechanic which enables
slow snapshots where normally time exposure would be required, which is
especially adaptable for interior photography.
This shutter will give automatic exposures as long as 1/2 second or
instantaneous exposures of any duration up to1/500 of a second. This is a small
but interesting and very usable feature., because increased illumination may be secured with automatic exposures, by
adding one or more of the exposures apertures to the full curtain opening
.
This adjustment consist of an escapement (C), which
permits the curtain to travel its full length utilising all apertures. As an
example, the curtain may be set for the full 8½ inch, 2 inch and the 1
inch opening. The shutter is adjusted to give time exposures of any duration.
The first open slit is 8 ½ inch, the next slit is 2 inch followed by 1 inch, ½
inch and at last the smallest measuring ¼ inch. Slits in centimetres
21-5-2,5-0,8 cm. Total length of the focal plane shutter including the run-up on
both rollers is 192 cm.
The open sections or slits are finished with 2 clips
existing out of a V-shaped metal strip embedding the opaque black cloth. The
bent over strips end in the straps above the open section. If any doubts about
the opaque or flexibility of the curtain fabric you may consider to replace the
fabric. For more info about this subject please follow this
link.
The revolving back may be released for turning to a horizontal, vertical or
intermediate position by pressing inward on small button directly below
shutter-winding mechanism.
Open camera by pressing forward on the spring catch directly opposite forward
end of handle, allowing the cover to open. Press the two side arms down to draw
the focusing hood taut.
The focusing hood may be released by pressing forward the small catch in top of
box permitting the hood frame to be raised for the purpose of cleaning the
ground glass.
Focusing
Set diaphragm of the lens open. The Lens front raises, lowers or swings with fingertip focusing
control. Interchangeable 5 inch lens board makes it easy to change lenses. The
bellows capacity = 13 ¾ inch = 350 mm.
The focusing hood opens automatically by pressing forward on
the spring-catch directly opposite forward end of handle allowing the cover to
open. Press the two side arms down to draw the focusing hood taut. Set the
mirror by pressing lever H down until it locks in focusing position. You may see now an image on the ground glass. Focus
the object by turning the focus knob situated on the front right side, for-or backwards
until the desired object is sharply defined on the ground glass . Set the diaphragm by
turning the diaphragm ring on the lens to the appropriate number. Set the shutter speed
according the aperture you found on the camera tag on front of the focusing hood.
Making the Exposures
To
make an instantaneous exposure when the object to be photographed is focused
sharply upon the focusing screen, press downward on lever E, near the front on
left-hand side of camera, releasing the mirror, which travels up out of the cone
of light, automatically releasing the shutter. As the action of these is
simultaneous, the object, although moving broadside to camera, can be located
perfectly in the center of the plate or film.
The
following table gives approximate speeds in fractional parts of a second up to
one second:
The curtain apertures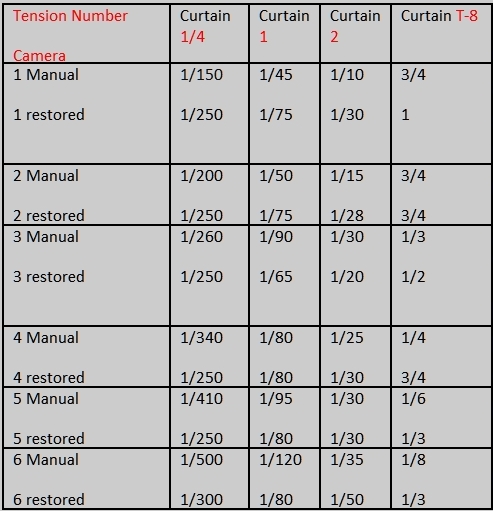
The shutter curtain contains
4 apertures ranging from full open O to 1/2 of an inch. When the letter O
appears in the window next to the winding key the (focal plane) shutter is
wide open. The other apertures Time 8
- 2 - 1- 1/4
inch follow in rotation at window F as key is turned to the
left. The shutter speed plate attached to the focusing
hood gives the approximate shutter speeds in fractional parts of seconds,
obtainable with the various combinations of curtain apertures and tension number.
Electronic testing
resulted in the table on the left. The first row shows the figures published in
the official 1912 manual. The second row shows the exposure times I found
testing the restored camera.
Setting the shutter
for Instantaneous exposures
Depress disc D, which surrounds the shaft of lever H and revolve
it until letter I stands directly opposite the white mark on lever H, indicating
instantaneous exposures. When using camera for fast instantaneous exposures,
also revolve disc C until the white line stands opposite R.
To set the shutter speed,
push down lever H. Slide the bar D to the left, exposing I indicating
instantaneous exposure. Wind the curtain by turning key A to the left, until the
required aperture appears at F. If the curtain is set at a smaller aperture than
required release the curtain by pressing the release button marked M backward.
Repeat this procedure until the proper aperture is registered at window F.
Setting the Shutter for Time exposures
Depress disc D and revolve until letter T stands opposite the white mark on
lever H, turn disc C until the white line stands opposite letter R. Wind the
curtain until T shows at the curtain aperture F. Set the mirror in the usual
manner. After focusing, release the mirror, which travels up out of the cone of
light. Begin the exposure by pressing lever M and terminate the exposure by a
second pressure on lever M.
Setting the Shutter for Slow Instantaneous Exposures
Slow
instantaneous exposures may be made by winding curtain until T shows on aperture
index at F, and turning disc C so that the white line stands opposite letter S,
which permits the full curtain aperture, 8", to pass over the recording field,
giving exposures as indicated in fourth column on speed plate, indicated as the
8" curtain aperture column. However, these slow instantaneous exposures may be
increased by winding curtain up until the 2" registers at letter F, which will
permit the 2" and 8" curtain apertures to pass the recording plane, giving a
251,' increased exposure to that shown in the fourth or 8" curtain aperture
column. It is not recommended that the entire number of curtain apertures be
allowed to pass the recording plane.
Setting the mirror
Press
lever H down until it locks. A
safety lock prevents the curtain from being re-wound before the mirror is set
when mechanism is set for instantaneous exposures, this prevents fogging the
plate or film while dark slide is withdrawn, making it necessary to set the
mirror before rewinding the shutter.
Caution !
A safely lock prevents the
winding of the curtain before the mirror is set in position.
This prevents fogging of
the film, making it necessary to set the mirror before rewinding the shutter
curtain.
 Regulating the shutter
speed
Regulating the shutter
speed
Tension on the curtain is
regulated by turning the milled head B to the right until the required tension
number appears at window G. The numbers run from 1 to 6, the highest number indicating
the greatest speed. If the tension number is set at a higher tension than
required, release the tension of the spring by pressing escapement P up und down
until the proper tension number is registered at window G. Example: for an
exposure 1/235 of a second, register curtain aperture 3/8 at window F and
tension 5 at window G.
Note: The photos on the left and right are taken of the Home Portrait camera
belonging to Vegar Moen Sweden. The condition of the leather covering was so
bad that it was removed. See for more info about the refurbishment. of the
Home Portrait this
page.
Photos © Jo Lommen
Instantaneous Exposures
After the shutter has been
set, and the image on the ground-glass focusing screen properly focused, the
exposure is made by one gentle, downward pressing of the release lever, located
on the forward left hand side of the camera body. The pressure on the
lever simultaneously releases the mirror and curtain. Slow
instantaneous
exposures of about 1/5 second can be made with the curtain set at O (full
opening) and tension 1. Pressure upon the shutter release causes the
mirror to
rise just before the curtain drops and thus closing the exposing aperture. When
making slow exposures the camera should be properly supported on a
table or tripod.
Time exposures
Press down lever H and
slide the bar D to the right exposing letter T indicating Time exposures. Wind
the curtain until the letter T is registered at window F. After focusing the
image release the mirror and commence the exposure by a gentle backward pressure
on button M. At the expiration of the required time, terminate the exposure by a
second pressure on button M.
Lens versatility
The Camera Body only cost
$ 150,00
With Zeiss Kodak Anastigmat f6,3 $ 240,00
With B&L Zeiss Tessar Ser Ic f4,5 $ 265,50
With B&L Zeiss Tessar ser Ic f4,5 $ 312,00
With Cooke Ser II f4,5
$ 270,00
With Cooke IV f 5,6
$ 230,00
Minimum focus of lens accommodated 10 inch
in recessed lens board and 12 inch in normal flat lens board.
Depending on which camera you have. Prior to 1916 the Home Portrait had a
recessed lens board and a slight rearward body bevel above the lens standard.
The recessed lens board was able to accommodate lenses as short as 10 inch. As
from 1916 the body was modernised: the bevel and the recessed lens board were
eliminated. About 1929 the almost pyramidal hood was enlarged for easier
viewing. The body of the Home Portrait
Graflex was even used for "Big Bertha" Photography. Its revolving back and large
lens standard were easily adapted to such giants as the 40 inch f8 Dallmeyer
Telephoto.
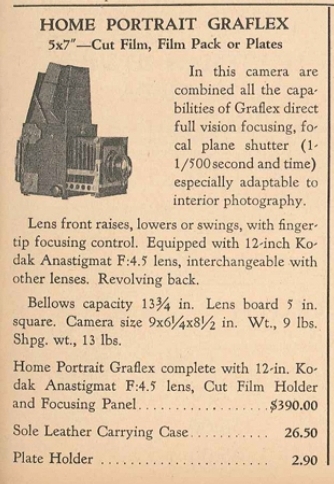
 In this camera are combined
all the capabilities of Graflex direct full vision focusing, focal plane
shutter, especially adapted to interior photography and other special features
to provide an outstanding camera for
home portrait work. The Graflex advertisement on the right side of the page
recommends all the features of this special camera. Here below the easy reading
text.
In this camera are combined
all the capabilities of Graflex direct full vision focusing, focal plane
shutter, especially adapted to interior photography and other special features
to provide an outstanding camera for
home portrait work. The Graflex advertisement on the right side of the page
recommends all the features of this special camera. Here below the easy reading
text.
Lens Versatility
The Home Portrait Graflex is equiped with a
lens front that raises, lowers or swings and with sensitive fingertip focusing
control. It readily accepts the Kodak Anastigmat and other f 4,5 lenses as well
as f 3.5 and telephoto lenses of approves selection. With the Home Portrait
Graflex it is possible to photograph indoors and under difficult conditions. The
operator can move freely from point to point, watching his subject in the
viewing hood, keeping his subject in perfect focus and always ready in an
instant to capture for ever that exclusive perfect moment of composition or
expression.
Versatility
The owner of the Home Portrait Graflex camera is enable to grasp
countless fruitful opportunities for making home portraits that live, far
removed from the stony stillness of ordinary posed pictures. Under many interior
conditions it is possible with the lens well open and with Super Sensitive Film
to use a slow instantaneous exposure - often of great importance when the person
is a lively youngster, perhaps with an active pet.
Large excellent Portraits.
The large film or plate area of this camera, 5x7 inches,
securing big images without approaching the subject too closely and a 12 inch
focal length lens lends good perspective all adding to the possibilities of the
Home Portrait Camera. While other special work also falls within its field, it
is primarily a home portrait camera and in such work its adaptability and
versatility place it first and foremost. The earliest Home Portrait camera
was made from 1912-1915. The next generation from 1916 - 1928 and finally the
latest from 1929-1940.
Operating the Revolving Back
The back of the Home Portrait camera can be revolved by pressing
the little know on the right side of the camera next to the winding key. Pres
and turn the back as far as you like up or downwards making it possible to use
the camera in landscape or portrait mode.
The
correct position to hold the camera for general work is against the body. All
controls are so arranged that the hands fall naturally into the proper position.
The right hand should grasp the focusing knob and the left hand the front corner
of the camera. The release lever is conveniently located so that it may be
operated by the left thumb.
Front movements
The
swinging, rising and falling front is controlled by milled head J at right-hand
upper corner of front. Being operated by bevelled gear and quick thread, it locks
automatically at any desired point, but should be centred as indicated by the
line on right-hand side before closing front of camera.
As the 5x7 inch film is still available, this beautiful press
camera can still be used in our modern digital era for taking fine portraits and
other studio or outdoor work. Most of the time the mechanisms are still in good
shape and only need thorough cleaning and a drop of oil or grease. The only
concern is the focal plane shutter fabric. After one hundred year the fabric is
brittle, stiff and full of tiny light leaks. Renewing this curtain is not very
easy and should be the work of a specialist. Also the focusing hood may give
some problems as the leatherette of the hood is worn out, broken or full of
holes. Ground glass can be broken and if the mirror is missing, broken or matt.
The mirror should be a surface mirror rather than a regular one, although some of the
Home Portrait camera users have a new regular mirror replaced and
they are real happy with it.
Repair instructions
Open the camera and remove the focusing hood.
Now you have access to the ground glass. Carefully remove
the springs holding the focusing ground glass. Remove the ground glass. You
have to loosen the shaft of the mirror mechanism by unscrewing the four screws
above the mirror. On the opposite side of the camera you find the round spring
assembly box attached by 3 screws to the camera body. Unscrew the 3 screws
one by one while holding the disc shaped box under pressure. After unscrewing the
last screw let the round box or assembly slip back in neutral position. Remove
the assembly from the camera. Now the shaft can
be pulled out by the mirror setting lever. Having done that the upper panel
can be easily removed by unscrewing the four screws of the panel. To get
access to the curtain and rollers assembly you have to remove the back. All screws are visible except the two ones holding the top of the back.
You'll find them beneath the holder slide lock in horizontal position. Do not
disassemble the roller from the curtain unless absolutely necessary.
To remove the lower panel
First release the tension of the lower roller by repeatedly moving knob P upward until figure 1(one) is visible in the
window. Unscrew the panel but leave the upper right screw. Unscrew the bolt
and place screwdriver in the slit of the shaft. While holding the screwdriver
in this position unscrew the last screw and tilt the panel. You'll now notice
the tension on the screwdriver and you may let slip the screwdriver through
your fingers until the tension is released. Now you can lift the plate assembly . Clean the
mechanism and use a tiny bit of oil to make it work smooth again. Check the
good working of the lower roller.
To remount the upper panel roll the curtain until it is in
open position. Make sure that the upper edge of the curtain matches with the
upper edge of the camera exposure opening. The figure in the window of the
upper panel has to be "O" . Find the right docking where the
gear of the upper roller shaft meets the tooth wheel with the figures. Replace the four screws.
Now replace the shaft into the hole and slide it as far as possible. Make sure
that the mirror is down and the position of the lever H is down. Replace
the four screws in the shaft on the upper side of the mirror. If that is done
you have to release the mirror so that is stays in high position. In this
position you need less power to finish the next step, the
most difficult part of the operation. You may need any help of somebody with strong hands. The
fact is that replacing the round box with the mirror spring is quite a job.
You will have to turn the disc shaped box clockwise two or three positions. I used a pair
of sharp pointed tweezers to turn the disc shaped box into its
position.
Remounting the lower assembly.
Set counter on position (1) one. Replace the panel
and place screwdriver through the hole of the panel in the slit of the gear of
the shaft.
Grab panel between thumb and forefinger and lift it so that you can freely turn the shaft
with the screwdriver without that the counter-mechanism is
connected to the gear of the shaft. Turn the shaft anti
clockwise until the spring tension is fairly high. While holding the tension on the
shaft with the screwdriver, replace the panel by letting it down. The
mechanism will immediate snap to the gear thus preventing that the spring in
the shaft releases. You'll be able to replace one or two screws and check the
shutter speed. The shutter speed will be fine if the curtain closes from
position Open to Close when pressing the release button and the
window shows tension 2. To increase the tension you may repeat the previous
procedure until the curtain drops nicely from the O to the close
position. Each time you release the shutter, you'll have to reset the
mirror.
Renew the
shutter curtain
Even if your classic camera seems
to be in good
condition and ready to use, you may soon find out that the focal plane shutter
is slow or even worse has pinholes
The above link to the page is very helpful if you intend to renew your focal plane
shutter cloth or want to speed up the exposure time.
The next photographs may help you to understand the perfect quality of the Home
camera in the hands of an artist such as Vegar Moen who lives in Sweden
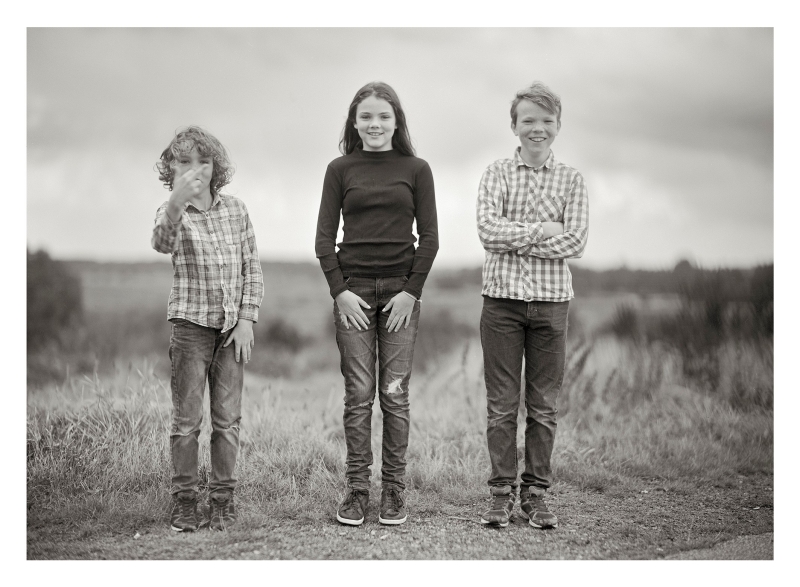
Svante, Signe and Sixten
Photo © Vegar Moen Sweden.
Using well adjusted classic cameras may
result in such an extraordinary good shot of your children.
Graflex Press 5x7 with Heliar
240mm / 3.5 lens wide open at 1/100th sec.
Handheld. HP5+ @ 200ASA,
Moersch Finol developer, 24 ‘C, 12 minutes. Shuffling in trays.
"Strangers
in Town"
This
exhibition was part of the NåDa project, funded by Norwegian Art Associations
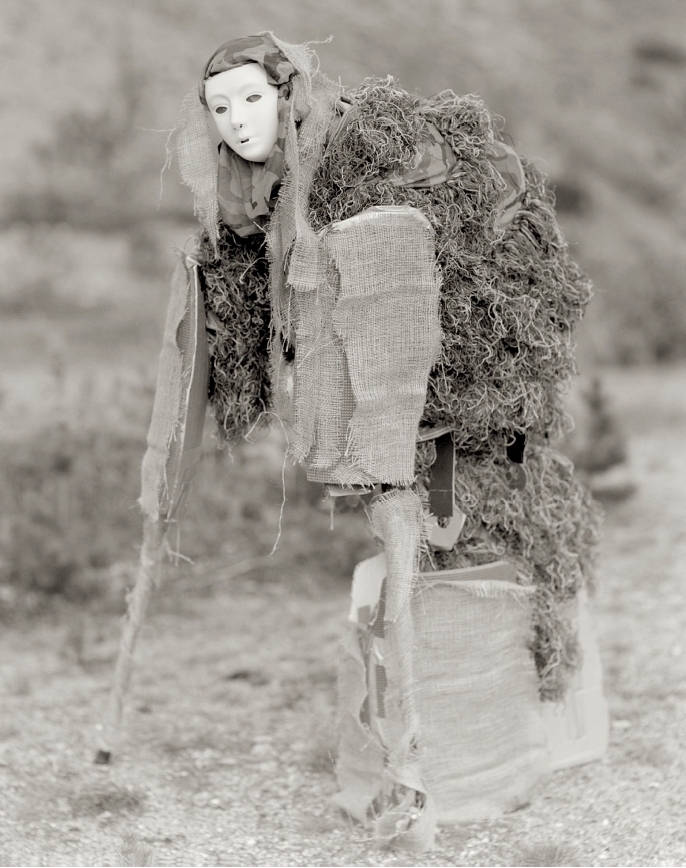
Photo © Vegar Moen
Johannes Hofstad 11 years old creates
his outfits from
materials found at the local waste disposal.
All photos by Vegar Moen were taken on film
with the refurbished Graflex 5x7 Home Portrait camera from1917.

Graflex
Cameras
Home Jo Lommen camera