Renewing the focal plane shutter fabric.
Please note that there is a certain
amount of risk involved in trying to repair a camera.
No guarantee is made as to the
accuracy or suitability of these procedures to a repair you are contemplating.
These repairs vary in difficulty -
assess your skill levels carefully before tearing into your camera, as I'm not
liable for any damage to person or property.
If you're stuck, contact me rather
than continuing and risking to make things worse.
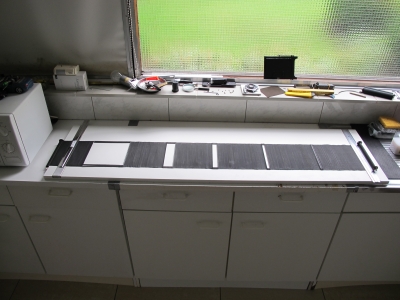
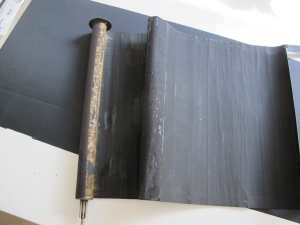
The old curtain stripped from the camera.
In this case it is a 5x7 inch Graflex Series B Camera. A reflex camera equiped with a Focal Plane Shutter. The Graflex focal plane shutters exist out of a dark-out or opaque cloth provided with slits of different width. The width of the slits in combination with the speed of the movement along the film determines the exposure time. Beside some minor differences these instructions can be followed for most of the Graflex Reflex cameras. Such as Series D and Auto Graflex Junior. The renewing of the focal plane cloth is much easier for the Anniversary or Pacemaker Speed Graphic cameras due to the lack of the mirror mechanics. There are however other types of focal plane shutters such as the dual self-capping curtain e.g. the Beseler press camera.
First step
remove old curtain out of the camera.
Before starting this project, the old focal plane shutter should be removed from the Graflex Series B reflex camera.
To do this, the viewing hood, ground glass, mirror setting mechanism, rollers and tension plate should be disassembled. In fact the whole camera is stripped down.
Follow this link to learn more.
The original curtain that will come off from the Graflex Series B camera is1655 mm long has a width of 190 mm and is 0,25 mm thick.
The shutter-curtain has 5 slits: 175-40-20-10-5 mm. Each slit is strengthened by one U-shaped clip on the upper and one on lower side of each of the slits. These clips are 0,85 mm thick including the enclosed fabric and made out of a sort of tin-plate. Easy to bend and thus easy to break as well.
 Renewing
this one century old brittle focal plane shutter curtain is not a piece of cake.
At least not for somebody like me who is not familiar working with cloth and
fabrics, cutting and gluing or anything else being non mechanical equipment.
Renewing
this one century old brittle focal plane shutter curtain is not a piece of cake.
At least not for somebody like me who is not familiar working with cloth and
fabrics, cutting and gluing or anything else being non mechanical equipment.
The original Focal Plane shutter exist out of 1 piece of 1655 mm long fabric including the portions which are glued to the rollers. Width is 190 mm. The fabric is 0,25 mm thick. The black rubberised coating on weaved fabric is mounted on two rollers. This essential part of the reflex camera is more than 100 years old! No wonder that the curtain needs to be replaced by a new one. The rubberised coating has become brittle and stiff in all these years and doesn't run smooth anymore. Beside that the straps are worn and some of them are broken.
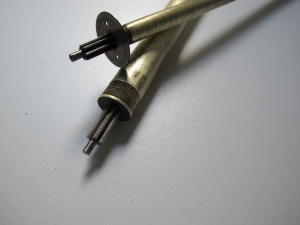
Both rollers of the focal plane shutter I mentioned above have a hollow shaft. The upper roller has a fixed gear on one end and on the other end a disk. The gear is coupled to the winding key as well as to the release button. The shaft has a diameter of 16 mm.
The lower roller shaft has a diameter of 9,6 mm. Both disks have a diameter of 25,4 mm. On one end the lower roller has a spring powered toothed gear which enables the roller to pull the shutter curtain down when the release button is pressed. The 190 mm wide fabric fits nicely between the two disks.
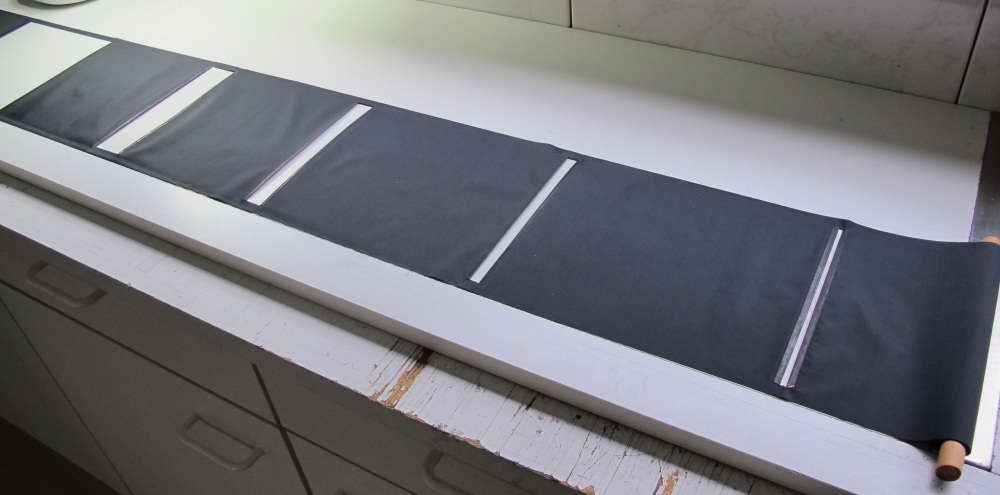
The Focal Plane fabric exist out of 6 “closed” sections separated by 5 open slits of different heights.
The “closed” sections are respectively A=335* B=175, C=175, D=215, E= 225 and F =290 mm including 60 mm glued to the lower roller.
(*this includes 190 mm fabric glued to the upper roller and 145 mm part of the visible curtain)
The length of the "open" sections are respectively 175 mm, 40 mm, 20 mm, 10 mm and 5 mm and 170 mm wide.
Note: The drawing on the left is not to scale.
How it looks like
The open sections are connected to each other by straps of the same length as the open slits. Actually the open sections are cut out in the entire length of the fabric. So the straps are an integrated part of the whole curtain fabric.
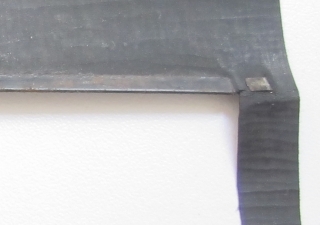
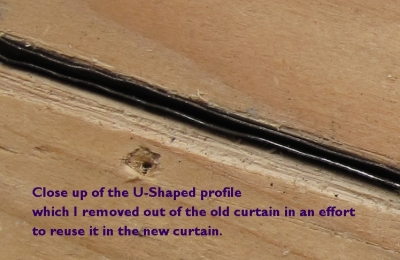
The end and begin of each closed section is provided with a steel u-shaped strip which holds the open section straight in position, prevents tearing of the fabric and further more serves for strengthening the focal plane shutter as a whole. These strips, clips or bars are 0,85 thick including the enclosed fabric.
For even more stability, one of the uprising sides of the U-shaped strip is a bit longer on both sides allowing to connect the strip to the straps.
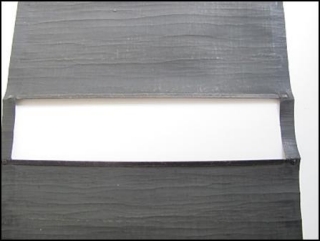
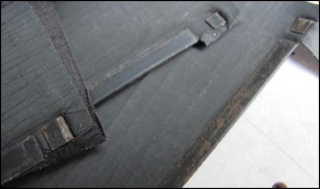
Close ups of the original focal plane shutter curtain.
On the left the 40 mm slit. Note the brittle rubberised back of the fabric allowing millions of tiny holes to blur your film.
Clearly visible both strips -U shaped clips- on top and end of each section. The extended ends of the U shaped steel bars are integrated in the straps to give the shutter more stability.
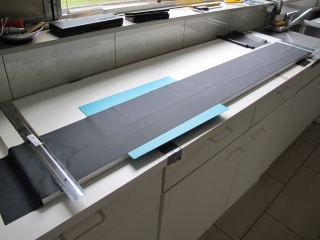
Now to the new Fabric.
The new fabric cloth (originally used in laser light laboratories) is very thin (0,12
mm) and very smooth, the disadvantage is that you even can’t hold it between your fingers
to cut it into the desired shape. It would slip away under your fingers. Beside
that you won't be able to cut such a fabric with clean edges.
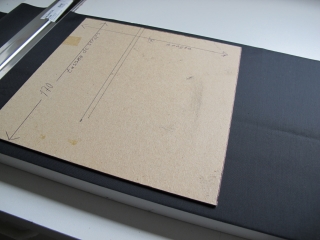
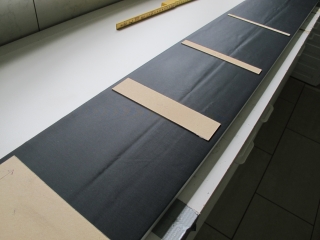
The next step is cutting the open sections into the long curtain. It may be a good idea to make patterns out of cardboard for each of the five sections. Using a rotary cutter or a new carpet knife. You may try that out yourself, which option suits you best. In any case use a self healing mat. The Prym Olfa self healing mat works perfect.
Once you have cut the fabric in the right dimensions, you may start to get the rollers off from the old curtain. Tear the brittle fabric from the rollers and clean them thoroughly by using an old carpet knife to remove old glue and textile. Carefully clean the toothed gear from dirt. The rollers should look like new before to be married again to the new curtain.
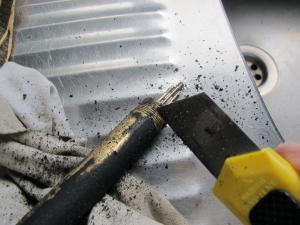
Once the rollers are cleaned and the open sections are cut out into the fabric, it's time to decide how to strengthen the open sections for use in the camera. Without strengthening the edges of the open slits or sections the shutter wont work. The edges of the slit would tear. There are two ways. The first would be to make new reinforcements such as iron or brass strips on both ends of the section or alternatively using the existing bars of the old curtain. The first way has been done by me previously, but the disadvantage is that such brass strips are 1 mm thicker and thus slower curtain. Beside that they should be packed by fabric to keep them in place. The second option turned out to be the preferable one, but due to the fact that we have to peel out the old fabric out of the notch of the u-shaped bars, also the most laborious. Although the latter is the most difficult way, it is definitely the best. I decided to go for this experiment. To get the "feeling" I made some try outs using two original u-shaped clips and cut some patches out of a piece of new black out fabric.
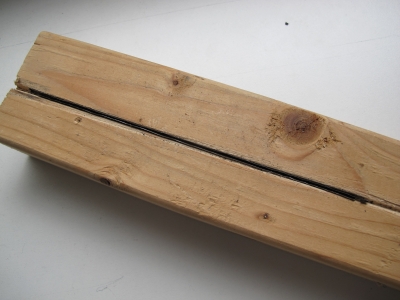
To prevent cutting myself, I used a wooden block with a groove in which the clip finds its place to work on. Peeling out the old fabric out of the clip was not so difficult as I expected to be. I placed the carpet knife between fabric and clip and pulled the knife along the fabric. I searched for a beginning and draw the rest of the old fabric out of the notch. Once free of old cloth and dirt, material, I widened the slit using a chisel.
Well, I've tried then several approaches to get the new fabric into the clips. Unfortunately it failed each time because the soft fabric is extremely, almost impossible hard to handle because it is too slippery. Filling the notch with some cement glue and then trying to attach the fabric into the notch is a hell of a job and the result is dramatic.
So what would be the solution? I cut out of a 0,25 mm thick black cardboard 3 mm strips and glued it to the end of the open section. After half an hour drying I could slide the u-shaped clips over the reinforced fabric. Testing confirmed that this is the way to do it, I glued the cardboard stripe and slipped it again back into the notch of the clip. Next thing to do is to squeeze the u-shaped clip together over the cardboard strip. The result is a perfect solid connection of the fabric to the clips.
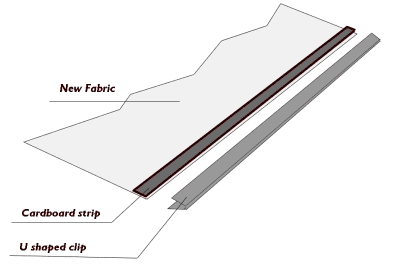
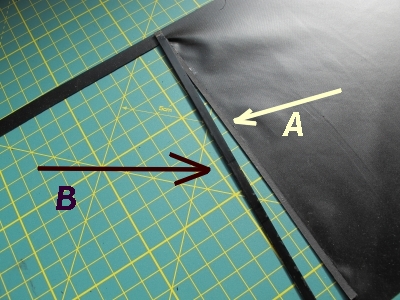
B is the cleaned old U shaped clip and A is the cardboard strip glued to the curtain ends, to reinforce the fabric.
Some opaque fabrics are less thick than 0,2 mm and need trusses to get a better
grip of the clips to the fabric. If the fabric is 0,18 mm > the card board
strips would be superfluous.
The best possible fabric you can get at the moment can be purchased from Mr. Kuramochi Nobuyuki
As his fabric is 0,18 - 0,20 mm it will need no trusses at all, the clips can be glued directly onto the fabric.
Left photo shows the reused existing clips of the old curtain
which results in a nice and clean, good running and reliable focal plane shutter.
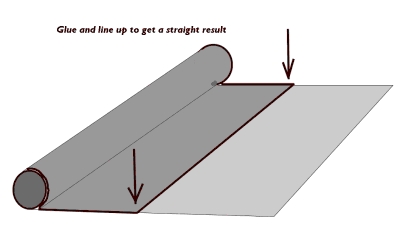
Line up the curtain.
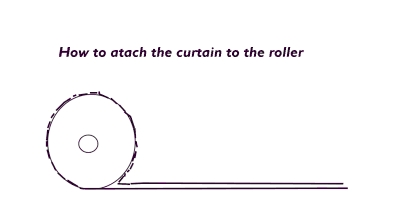
Finishing the Focal Plane Shutter Curtain: both ends of the new shutter curtain should be glued to the cleaned rollers. Note that this has to be done very accurately. As one mm on the top roller may result in a slope of 1 cm on the lower with a bad or non working focal plane shutter as a result. To prevent this, the start section (A) of the curtain should be attached to the upper roller as shown in the figure above. The fabric should be laid around the shaft while taking care that the end of the curtain matches with the under laying curtain while the cement is still wet to allow corrections if necessary. As soon as the fabric lays in the right position, wait till the glue is dry after which you may proceed by gluing the rest of the start section fabric up to 145 mm from the edge of the first open section.
Gluing 60 mm of the F section to the lower roller should be done the same way as the upper roller.
The result should be like this.
Mounting the new shutter into the camera.
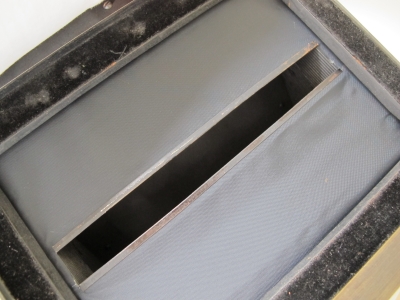
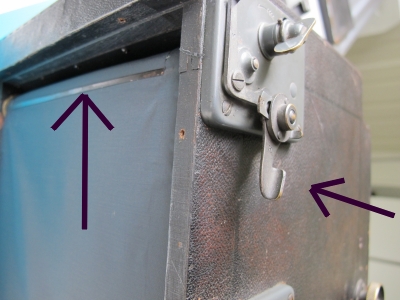
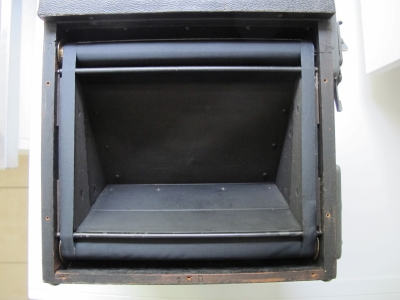
Before mounting the focal plane shutter into the camera check both rollers on top of the inner dark box on which the curtain should run. They should run freely without any friction.
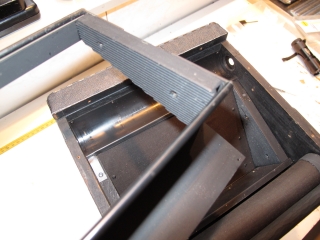
Inner dark box with roller on top and bottom.
Prepare the camera to mount the focal plane shutter. Clean the interior trying not to touch the optical reflex mirror. These mirrors are very vulnerable. Fingerprints, cleaning with cloth or anything else would ruin the silver coating. If it would be absolutely necessary, you may use a soft brush. Clean the bearings and mirror escapement. Insert the upper roller and next the lower roller. Turn the lower roller ant clockwise until the curtain is positioned with the 175 mm open section in front of the back of the camera.
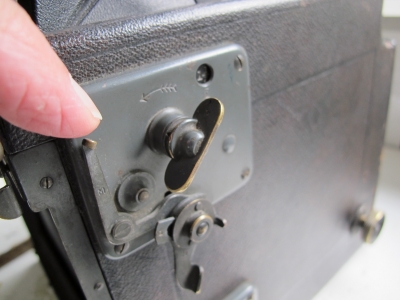
Winding Key A- Window F - Release Lever M- Mirror setting H- slide bar D - Instant and Moment setting
Right position of the winding key. Pull lever M to release shutter.
To remount the upper (winding key) panel, replace the new focal plane shutter assembly with the upper roll in top position and the gear on the right. Roll the curtain a bit off until the largest open section matches with the open camera back in such a way that the upper and lower edge of the open section are both 1 cm above or under the camera edges. The figure in the window of the upper panel has to be "O", visible in the middle of the window. The winding key should be in its locked position. That means that the winding key can be moved to the left (arrow) but not further to the right. (position as shown on photo above...North north east). If the winding key unintended is turned and the figure in the window is not "O" you will have to take off the plate and turn the winding key some rounds to get the "O" back again in the middle of the window. Replace the plate and start again or continue.
Find the right docking where the gear of the upper roller shaft meets the tooth wheel with the figures. Replace two of the four screws. The upper roller is fixed now, but that does not mean that it is in its final right position. We come back to this later once we have mounted the lower roller.
If necessary roll on the lower curtain, place the roller inside the camera, first the right side disc with the gear down inside the opening. Next the left disc. There is a bit of play between the inside roller and the housing allowing it to pass by. Now search for the bearing on the left. Pull out the gear on the right and once the opening of the bearing has been found, the shaft will find its place automatically. Try if the roller moves freely.
As you know the lower roller has an inside tension spring. Turn the gear some turns anti clockwise before mounting the lower tension plate. The roller gear docks easy into the tooth wheel. Two screws will be enough to mount the plate provisionally. We come back to this later.
Check if both rollers have been mounted correctly by turning the winding key just a quarter of a turn. The curtain should move nicely between the discs. If you are sure this works nice, you may continue by setting more tension to the lower roller. This can be done by unscrewing both plate screws, while holding the plate against the camera body. With a fitting screwdriver inside the gear opening, you may control the tension when you take off the plate, but not all the way. Just enough to free the gear from the tooth wheel. With your other hand turn the tension until you feel more resistance. May be between five and ten turns would be enough for the moment. Gently press the plate against the camera body while turning the gear a bit so that it docks with the tooth wheel. Fasten screws.
Both rollers have been installed, but the shutter curtain is not synchronised. We have to check if the curtain moves nicely when we release the shutter. However we can not use the body release lever, because the mirror is not yet installed and thus the mirror spring can not swing up the mirror in order to release the curtain.
To release the curtain for checking the good working of the focal plane shutter, we'll need a release lever. We cannot use the front release lever because the mirror is not yet coupled and spring powered, so we are going to slide the shaft with the H lever in its place through the mirror adjustment, without attaching the shaft to the mirror. This lever enables to release the shutter without a working mirror. This prevents a lot of work, installing and reinstalling the mirror each time the curtain should be reinstalled because of a wrong setting.
Tension Spring
The torsion spring inside the lower roller of the focal plane shutter exist out of two springs connected from the centre of the inner shaft to the end of the outer curtain fixed roller shaft. When wound the inner shaft tries to pull the outer back in home position. Releasing the upper roller causes the curtain to drop down till the next position. For more details about its working check here.
Tension setting
Get a fitting screwdriver and keep it ready while you partly remount the lower plate in such a way that you still can turn the spring of the lower roller. Place the screwdriver into the hole of the bearing. Lift the plate but be prepared of the spring power. Turn the spring gear anticlockwise until a stronger resistance can be felt. Move the tension plate a bit to allow the gear of the roller to snap into the sprocket of the tension plate and tighten the screws.
Setting the Shutter Curtain
Now that we have more tension on the curtain rollers, you may turn the winding knob. You see and feel that the curtain is moving upwards as you turn the winding key. Each time you hear and feel the click, another setting is reached. The first is setting "T". Now check if the back of the camera is fully covered by the closed section B of the curtain. Turn the winding key for the next setting until 1 1/2 appears in the window and cheque if the closed section C covers the whole back of the camera. Proceed this with all the other settings until the winding knob can not be moved anymore. The figure in the little window reads 1/8. Now the curtain has been wound till its maximum, the M lever will help us to release the shutter while the mirror not has been powered yet. Check the working by pulling the H lever backwards. The mirror will snap into a 45 degree position. A gentle backward pressure will start the "exposure" procedure. The mirror will pop up and the curtain will be pulled down. Release arm M and terminate this action by a second pressure on lever M. In this last action the curtain will be pulled down another centimetre. This is because we use the M exposure release which needs two actions, one to open and one to close the shutter (curtain). Rewind the curtain and repeat the previous action while watching the curtains position. The curtain should be pulled down and must cover the whole open back of the camera. No open slit should be visible at the upper nor at the bottom side. Release the arm M again and once more the curtain must cover the whole open section of the camera back not allowing a fraction of space between the shutter curtain and the open back. This should be the case in every of the five shutter exposure times. If you are lucky you can proceed. If not, you'll have to find another setting for the upper roller, one teeth up or one teeth down until you've found the right setting. This may cost you some time and stress. Don't give up. Take a break and think.
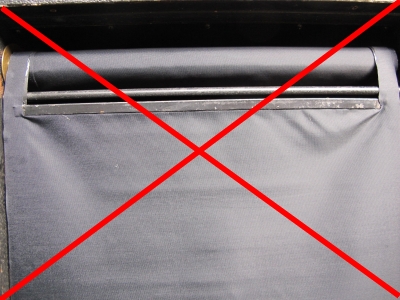
On the left the right setting when the mirror is down and the shutter has been cocked by winding the shutter. Lever H is straight down and the fabric of the shutter covers the open back completely. The second photo shows that the closed section does not cover the open back completely and light will pass through the open slit. On the right the open camera back in "O" setting showing the largest open section of the curtain. You may see the upper strip on top of the upper roller. This may give you an an idea of the ideal position of the shutter curtain in relation with the winding mechanism. Once we managed to get the right setting, we'll continue by
Reinstalling the Mirror
The shaft with the H lever has been placed before, but still not connected to the mirror. Make sure that the mirror is down. If not use a screwdriver and push the wooden mirror carrier down without touching the mirror. The mirror will snap automatically in its position. Keep the H lever down until the 4 screw holes match with the 4 screw holes in the shaft. Replace the four screws in the shaft on the upper side of the mirror. Now the mirror has been coupled to the shaft again and makes it possible to use the M release lever. Although the mirror is coupled it must still be powered by spring tension to complete the shutter release action.
The Spring Power
Press the release lever on the left side of the camera and help the mirror to pop up and stay in horizontal position. You may do that by using the front lens opening for better approach to the mirror. The horizontal position will help in the next task which is the remount of the disc shaped box with the mirror spring. In horizontal position you need less power to load the spring. It is the most difficult part of the operation. You may need some assistance of somebody else. The fact is that replacing the round box with the mirror spring is quite a job. You will have to turn the disc shaped box clockwise two or three positions. I used a spanner wrench to turn the disc shaped box into its position. At the same time while keeping the disc in position the disc should be fastened to the body. Not easy !
Once this ends successfully, we check the working of the release lever on the left near the front side of the camera house. Cock the mirror by pulling the H lever. The mirror comes down in 45 degree position. Wind the shutter until the window reads 1/8 and release the shutter by downward pressure of the front release lever. Pull lever H again and release again. Repeat this procedure until no figure is visible in window F. While doing this, check constantly if the focal plane shutter moves smooth along the camera back. It is possible that the spring power is too low and the curtain will not be pulled down completely. In that case you must power up the spring tension.
Here below the Series B exposure table. The more spring power the faster the curtain moves and the shorter the exposure times. However there is a limit. Please take in mind that the spring is 100 years old and I would not guarantee the spring can hold such a power.
The official exposure table Super B
|
Tension |
Slit 1/8 |
Slit 3/8 |
Slit 3/4 |
Slit 1 ½ |
|
1 |
1/350 |
1/110 |
1/40 |
1/10 |
|
2 |
1/440 |
1/135 |
1/50 |
1/15 |
|
3 |
1/550 |
1/160 |
1/65 |
1/20 |
|
4 |
1/680 |
1/195 |
1/75 |
1/25 |
|
5 |
1/825 |
1/235 |
1/80 |
1/30 |
|
6 |
1/1000 |
1/265 |
1/90 |
1/35 |
Photos and drawings © Jo Lommen
https://jolommencam.com/