Graflex RB Series "B"
The revolving Back and
Graflex Junior.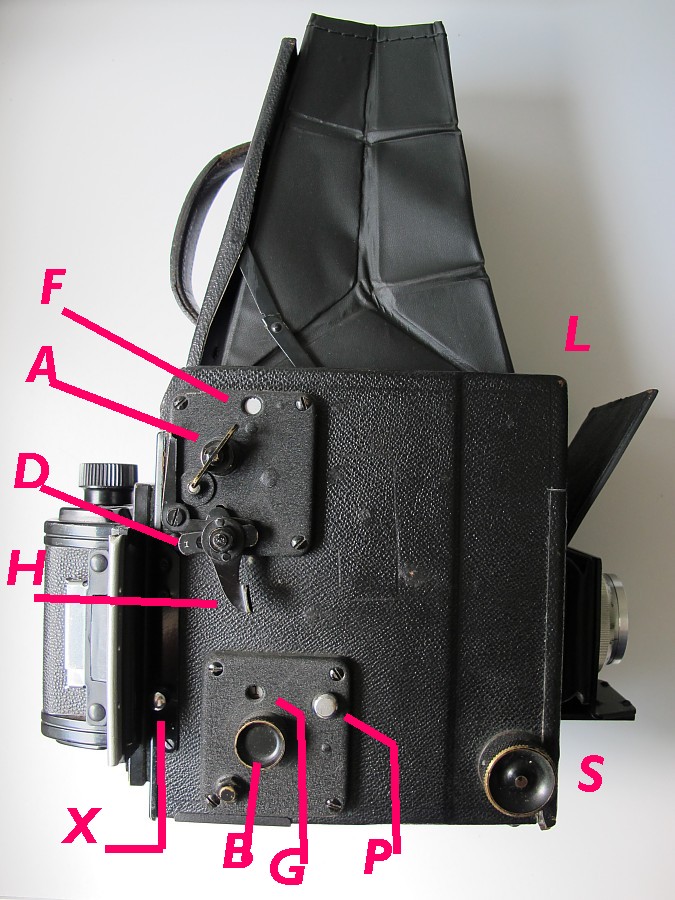
photo © Jo Lommen
Directions for Operating The Revolving Back Series B- D and Graflex Junior
The
main part of the below instructions has been copied from the original Graflex manual.
Graflex RB Series "B"
The revolving Back and
Graflex Junior.
photo © Jo Lommen
Directions for Operating The Revolving Back Series B- D and Graflex Junior
The
main part of the below instructions has been copied from the original Graflex manual.
OPENING CAMERA
Open camera by pressing forward on the spring catch directly opposite forward end of handle, allowing the cover to open.
Press the two side arms down to draw the focusing hood taut.
POSITION OF CAMERA
The correct position to hold the camera for general work is against the body. All controls are so arranged that the hands fall naturally into the proper position. The right hand should grasp the focusing knob and the left hand the front corner of the camera. The release is convenient located so that it may be operated by the left thumb.
SETTING
THE MIRROR
Press the lever H down until the mirror locks in focusing position.
FOCUSING
Release the spring catch L, and raise the cover, which automatically extends the Focusing Hood.
Press down the two side arms, locking the Focusing Hood in rigid position.
Rack
the lens out with the focusing pinion S, which causes the lens cover to open
instantly, exposing the lens.
THE
CURTAIN APERTURES
The shutter curtain contains 5 apertures ranging from full opening 0 to 1/8 of an inch.
When
the letter 0 appears at F, the shutter is wide open. The other apertures, 1½,
¾, 3/8 and 1/8 will appear in the window F as key A is turned to
the left.
Newer cameras have aperture letter O-T-A-B-C-D
Note: While winding the shutter the letters O-T-A-B-C-D appear in the window F.
The small 2x3 inch Series B camera needs two winding turns for the next curtain aperture.
THE
SHUTTER SPEED PLATE
The
metal plate, attached to the Focusing Hood, gives the approximate shutter
speeds, in fractional parts of seconds, obtainable with the various combinations
of curtain apertures and tension numbers.
Push
down lever H. Slide the bar D to the left, exposing I, indicating instantaneous
exposure.
Wind
the curtain by turning key A to the left, until the required aperture appears at
F. If the curtain is set at a smaller aperture than required, release the
curtain by pressing button M to the left, until the proper aperture number is
registered at F.
CAUTION
A safety lock prevents the rewinding of the curtain before the mirror is set in focusing position.
This
prevents fogging of the film, making it necessary to set the mirror before
rewinding the shutter curtain.
REGULATING
THE SHUTTER SPEED
Tension
on the curtain is regulated by turning the milled head B to the right until the
required tension number appears at G. The numbers run from 1 to 6—the highest
number indicating the greatest speed. If the tension number is set at a higher
tension than required, release tension of spring by sliding escapement P, back
and forth, until the proper tension number is registered at G. Example: for an
exposure of a second, register curtain aperture / at F, and tension No. 5 at G.
INSTANTANEOUS
EXPOSURES
After
the shutter has been set, and the image on
the Ground Glass Focusing Screen properly focused, the exposure is made by one
gentle, downward pressure of the release lever, located on the forward,
left-hand side of the camera body. The pressure on the lever simultaneously
releases the mirror and curtain. Slow instantaneous exposures of about 5 second
can be made with the curtain set at 0 (full opening), and tension No. 1.
Pressure upon the shutter release causes the mirror to rise just before the
curtain drops, closing the exposing aperture.
Press down lever H, and slide the bar D to the right, exposing T, indicating time exposures. Wind the curtain until the letter T is registered at window F.
After focusing the image, release the mirror, and commence the exposure by a gentle, backward pressure on button M.
At the expiration of the required time, terminate
the exposure by a second pressure on button M.
VERTICAL
AND HORIZONTAL PICTURES
Press
button X, and revolve the back to vertical, horizontal, or any intermediate
position. This can be done without danger of fogging the plate or film when the
dark slide is drawn.
ACCESSORIES
All
Graflex Attachments will interchange with the Plate Holders on Graflex Cameras.
The Graflex Plate Magazine is designed to carry 12 Glass Plates or cut Films in
metal sheaths; the Graflex Roll Holder (1915 model) takes the new Eastman
Graflex Film, consisting of 6 exposures; the Graflex Film Pack Adapter takes the
Premo Film Pack.